Spruce up your home

I have three kids who range in age from 10 to 3. I love decorating and having nice things in my home. But it is a home. I want my kids to feel comfortable. It also seems like anything I LOVE they find a way to break. Sometimes it’s the Anthro vase that got hit by a football, sometimes it’s the huge vase that I found broken and hiding in the closet, no one has fessed up to that one yet, LOL!

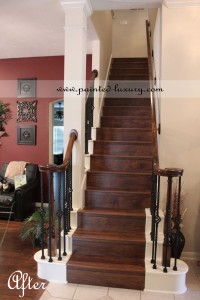
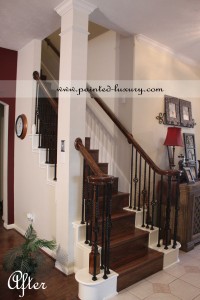
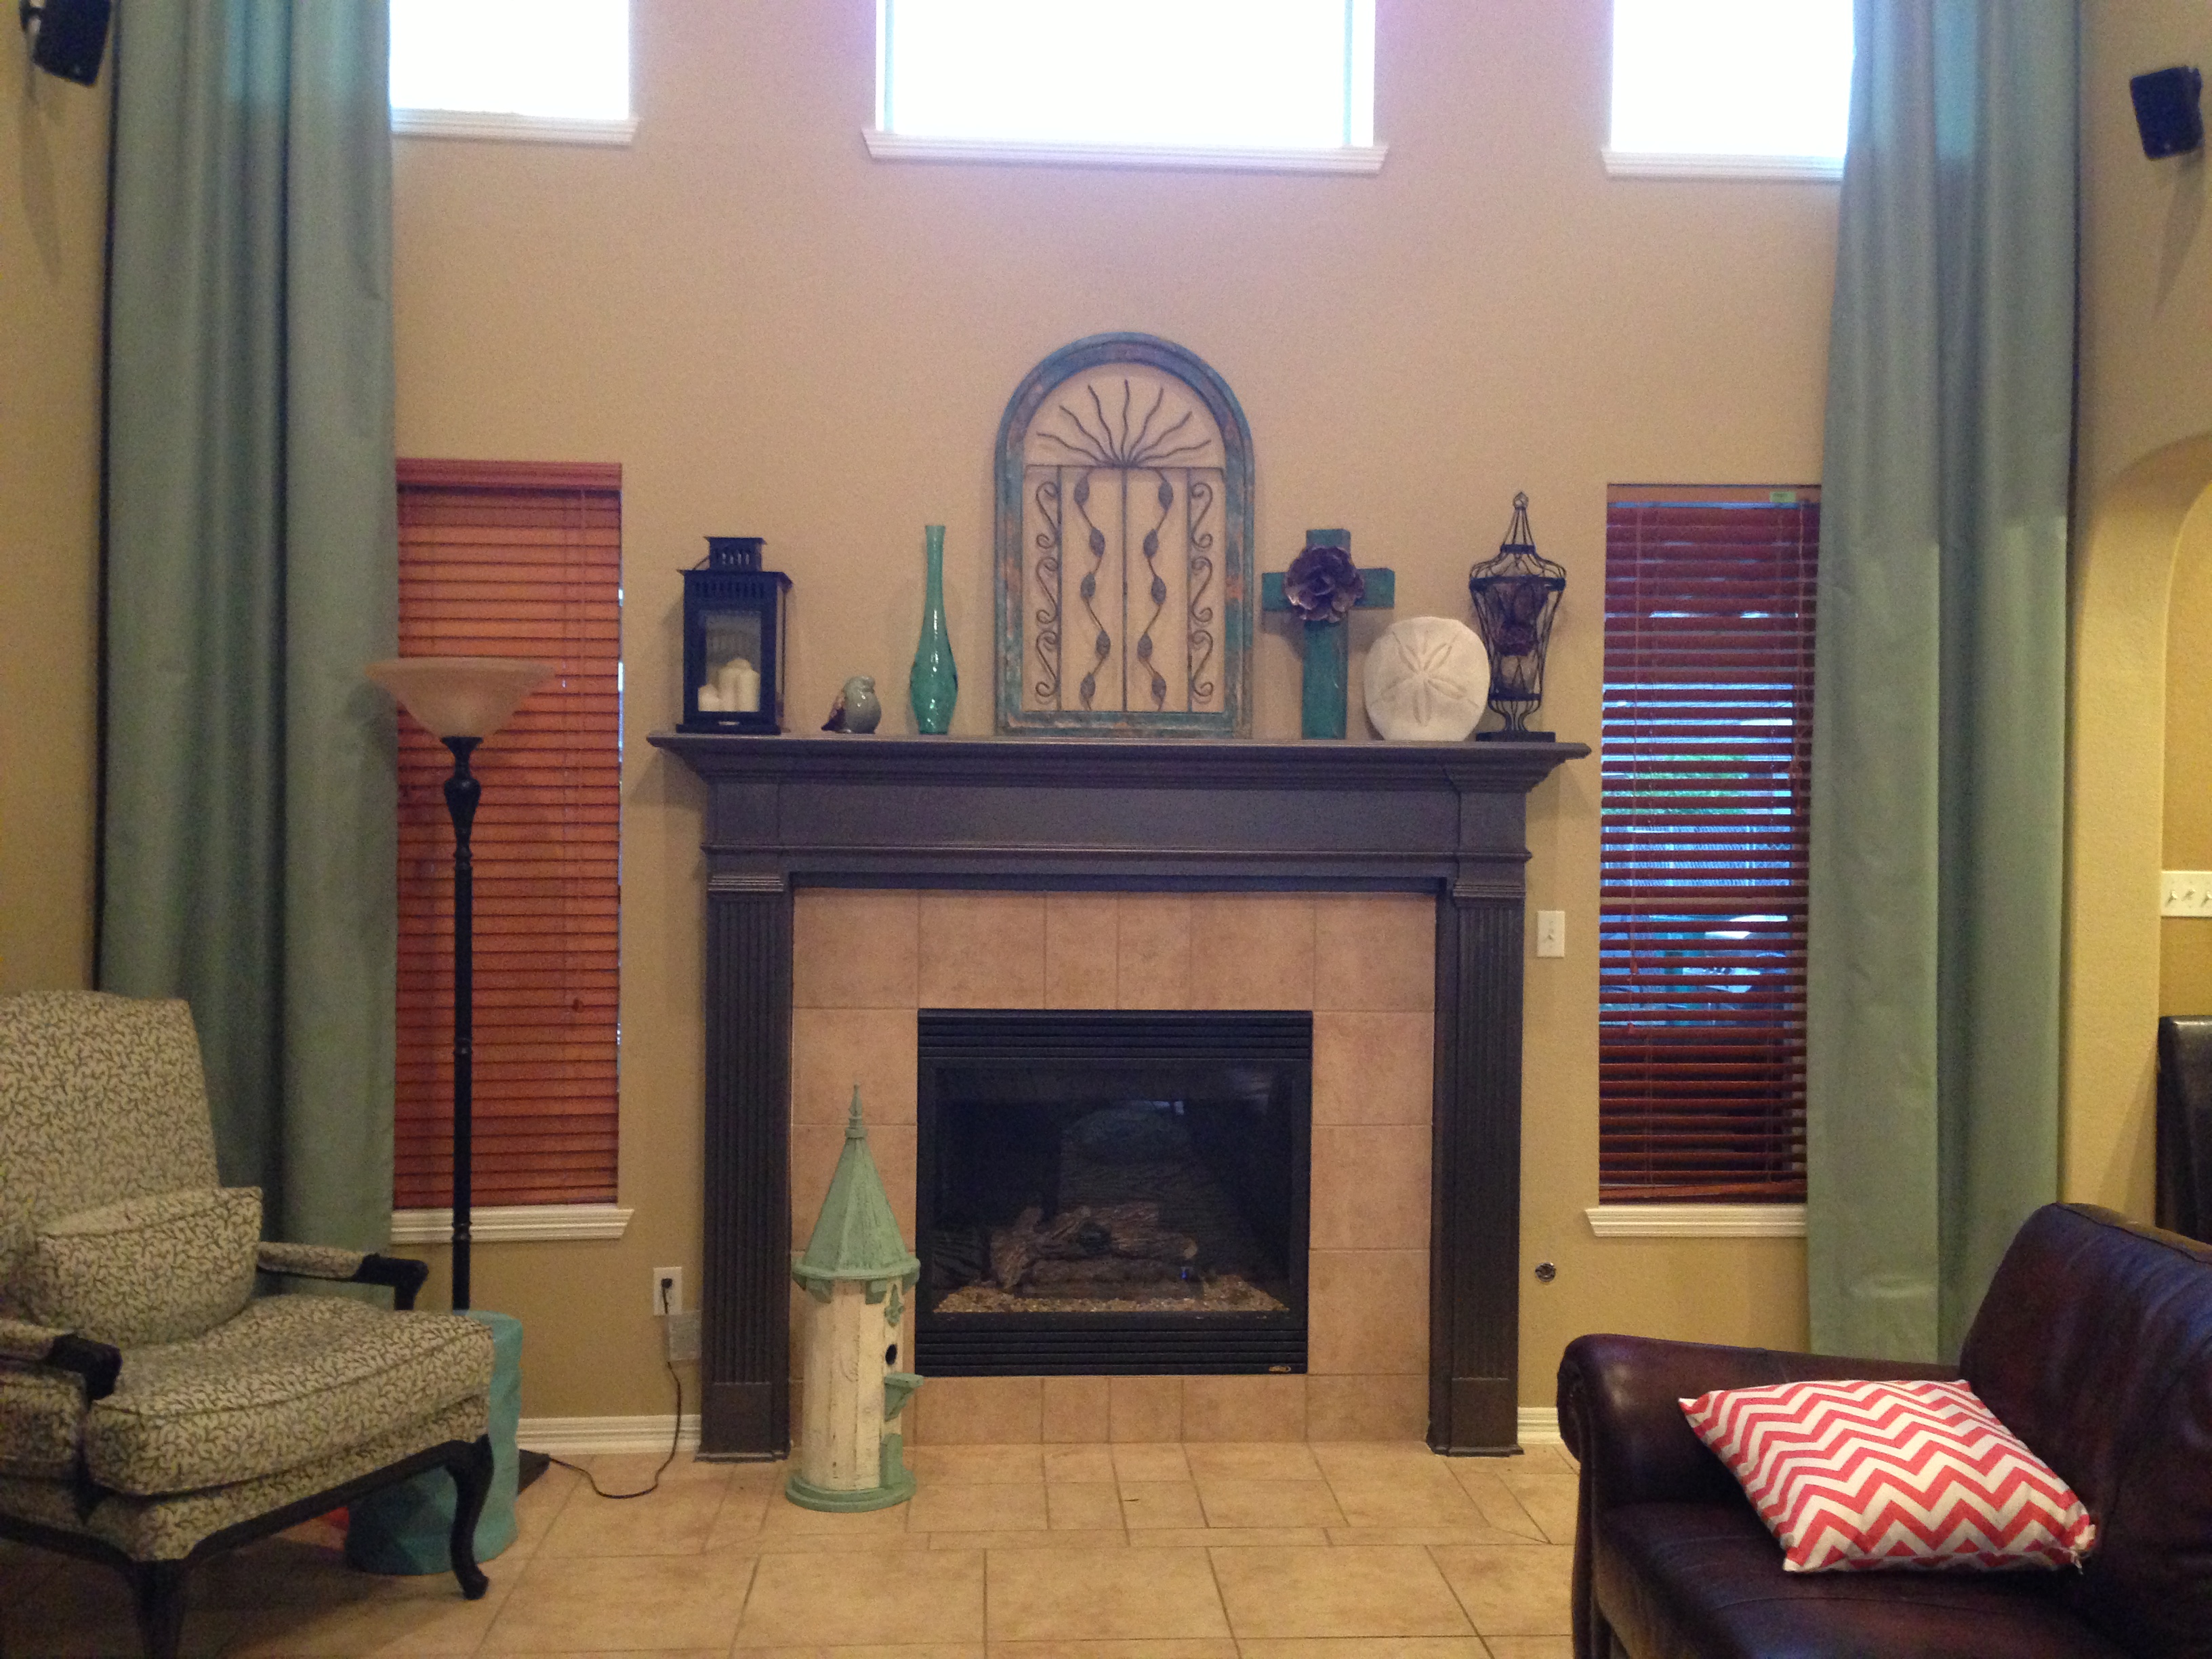
I think it is why I enjoy painting so much. It’s durable, adds a punch of color and gives personality to a home. Here in Houston most of our homes are mass produced and what you do with your home is what makes it unique. After being very busy for most of the spring I decided to take a little time and do two things that I had been wanting to do in my home. I had a white high gloss mantle. It served its purpose but didn’t speak to me. While looking for a “greyish” color for a client I found “aged smoke”. It immediately spoke to me. It’s a metallic without being shiny. Amazing what they can do with creating paint!
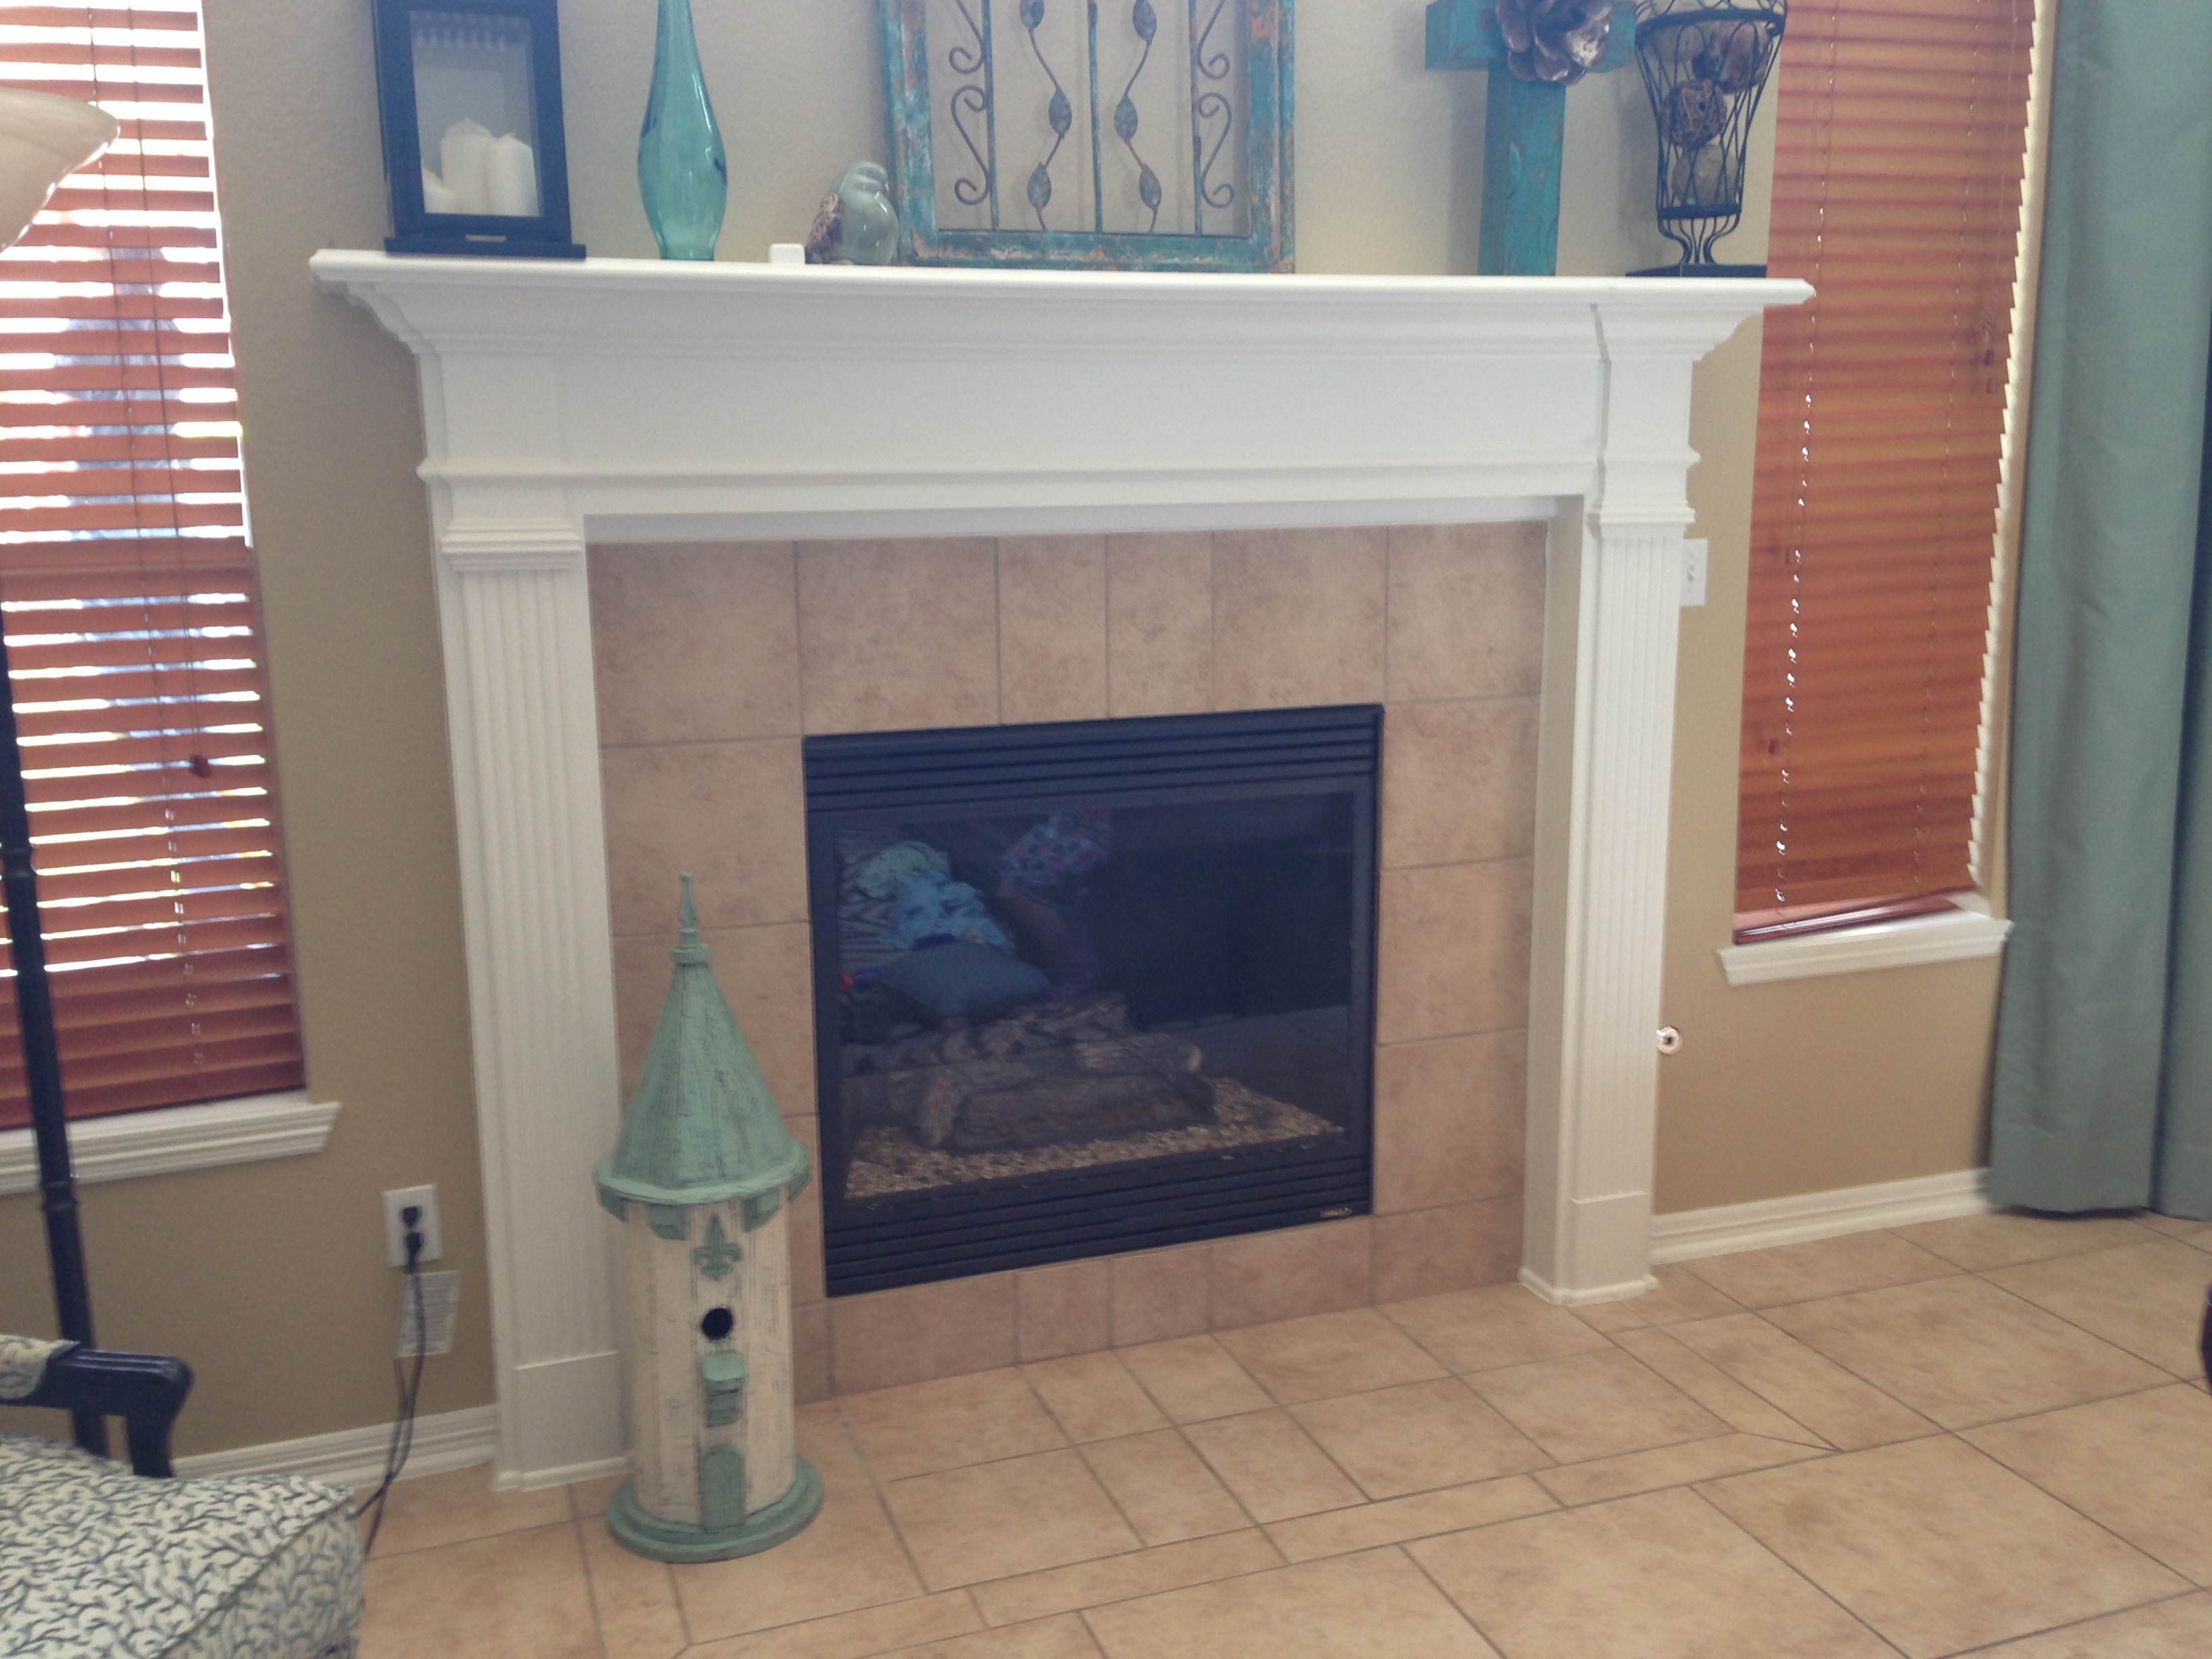
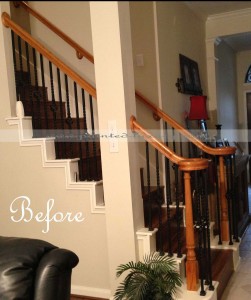
Before

Before


After, aged smoke mantle

After, aged smoke mantle

My second project was painting my pantry door. My husband has been wanting me to do this for ages. We love blue, turquoise, color. I do try to keep the large items and most of the walls in my home neutral. I read in “Young House Love” to always have something unexpected in a room. This is my motto. Here is my unexpected!

IMG_3223

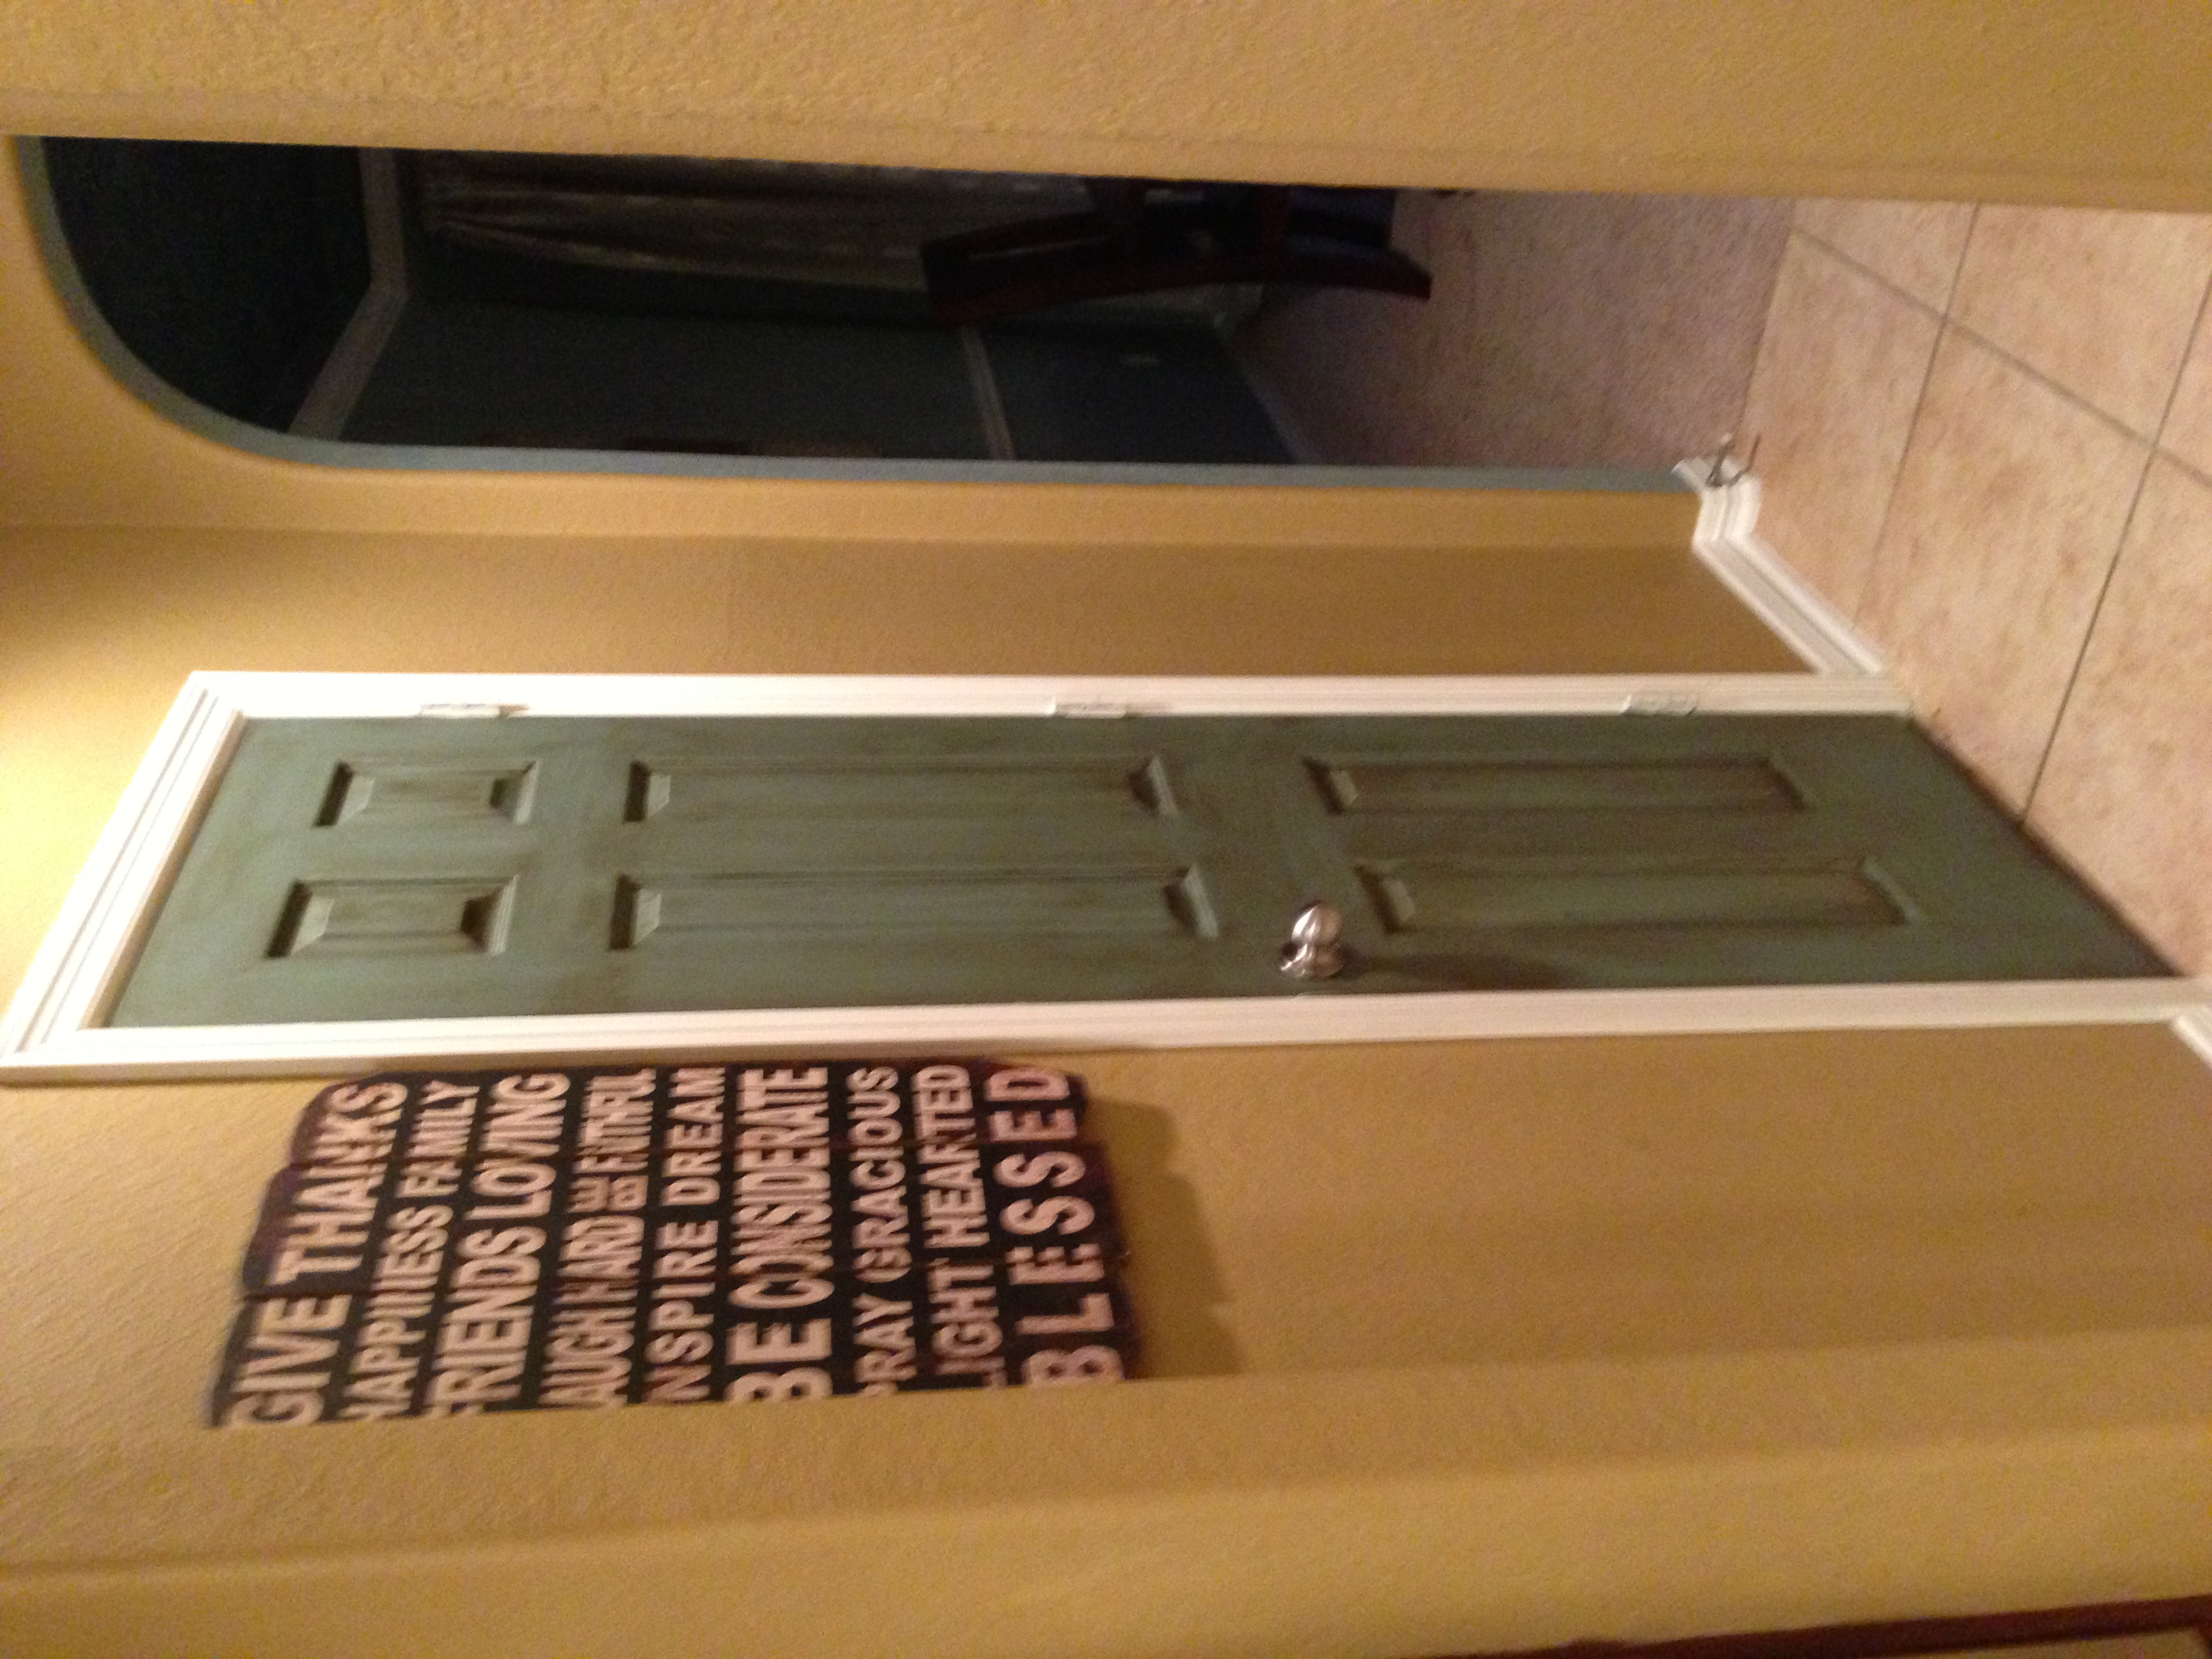
The color is a custom color made out of necessity. I didn’t have enough paint of the color I wanted to use so I mixed a few colors I had on hand to get as close to the original color as I could. I think it came out pretty well.


It would make my day if you would leave me a comment about my projects. Make sure to always make your home your own!


Candace


Amazing what a little stain can do!

after spata 1I love this picture. I love this technique. I have so many requests for it. You have a nice wood kitchen, staircase, or bathroom…but you don’t care for the color wood? That’s where I come in! This beautiful kitchen started like this:

before spata 1It’s such a dramatic change. If I hadn’t changed it myself I would think it was two different sets of cabinets. You are able to keep the beautiful look of wood while making it richer, more dramatic. I have a revolutionary technique that I use to change the color of your cabinets, permanently! Because I am able to do it without sanding the cabinets down to bare wood it makes it affordable for any kitchen.

before spata 2 after spata 2


The homeowner loves her beautiful hardwood floors but wanted her staircase banister to match. It’s so amazing because most homeowners think they are stuck with the stain of their banisters!

spata-staircase-before-1 after-spata-staircase-1 spata-staircase-before-2 after-spata-staircase-2


     I hope you enjoy the pictures. It would make my day if you would leave me a comment!


Bathroom and Mantle makeover

It’s been a while since I posted. So excited because that means I’ve been busy. I wanted to share one of my recent projects. When I grew up my parents built many houses and they picked out everything. They picked out the door knobs, the fixtures, EVERYTHING! I can remember my mom making the comment that it was very overwhelming.
Here in the Houston suburbs we don’t have to worry about the headache of picking everything out. Instead we get to deal with the boringness (oh yea just made that word up) of the dreaded BUILDER GRADE! Most bathrooms are stark white MDF. One of my very favorite projects to take on is giving them some character. The homeowner chose an off white color with a medium glaze for her finish.

I always get ahead of myself for the before picture. This one was taken after I took the door off. I love the dimension that the after has. It’s hand painted and a look that a factory can’t duplicate. Here is a shot of the master bath:

The cabinets had a few flaws that I was able to fix and I hope she enjoys her new cabinets. While I was there she gave me the greatest compliment by asking me to do her mantle to match as well!

Once again I got ahead of myself with putting up my frog tape… I just love this and it made me want to come home and repaint my mantle.

While this is a project that I love I will caution the DIYers out there. You need to make sure you use a durable paint and quality sealer on bathroom cabinets. They get the more wear than most things in your home. Take your time and make sure you prep, prep, prep. A great alternative would be to have me give you a free, no obligation quote :).

Antique Desk

041I thought in this post I would share one of my favorite refinishing projects of late. This desk/table belongs to my client’s husband. He was always against having anyone touch it until he saw some of my work. I was so flattered when she called me to come look at it. It has so much character. I know that they bought it from an antique dealer before they were married and had not done any work to it since then.

Starting to refinish furniture has struck my sentimental side. This piece had been stripped at one time, I also found layers of yellow and black paint. It would be so awesome to see a sturdy, weathered piece of furniture through all of its stages in life. I can’t help but think of my days with my hair black, then light blond and also red before admitting that God knew what he was doing when he made me a brunette. Apparently my furniture had an identity crisis as well.

Before of desk

Before top of desk

Before top of desk

Please take special notice of the top of the desk. My client has four busy children who decided to help decorate. There was pen, marker and crayon decorating the top. I knew that I wanted to refinish the top piece but it is made out of a soft wood. No amount of stripper or sanding were taking the marker off. I feel like it had stained deep into the wood. Finally after many google searches I tried hairspray (no luck) and rubbing alcohol. I was amazed at how well it worked. So with the top taken care of I stained it a medium honey stain and painted the bottom black. I just love how the black makes the legs and details stand out. To weather the kids I put many layers of sealer on it.  My client loved it and I hope you do too!

After 1

After

After top

After leg closeup


Buffet Redo

So one day early this summer I purchased a buffet and a matching china cabinet. I wanted to do them in two different finishes but loved the bones of the pieces. My dear husband went to pick them up for me after work, he rocks like that. He called and said, “are you sure you want this?” My answer was yes, just trust me. His concern was over this:

The ends looked like they had been chewed and the veneer was in terrible condition. All I could see was great lines and details and beautiful original hardware. There were times when redoing this piece that I wished he would have left it at Goodwill ;)!

My inspiration for the finish was one that I saw at a high end decorating store. The finish is made to look like it’s been there forever and is showing its wear. I hope you like it! Leave me a comment to let me know what you think!


My favorite part is even though I cleaned up the hardware I left a patina on the brass.
And just for fun here is a closeup of the items on top. They are all available at the fall markets Painted Luxury will be attending. Check out the “Where to find us” tab to find out more!


Finally finished project!

So on June 15, I made this post on Facebook

It’s a before picture of this cute cabinet with shutter doors and wrought iron details that I picked up. I was so excited to find it, I felt like I found a treasure. Not only that but I could pick it up without dear hubby’s help. I put a picture on Facebook to give me motivation to get started. I love to paint and love coming up with the ideas for my projects but for some reason I had the hardest time putting into action what I had in my thoughts for this piece. Every piece I create is unique, one of a kind but I’d been hunting for something with shutter doors for so long I wanted this to be special.

This piece was a trial and error piece. I would paint a coat, wait a few days, paint a different coat, wait for inspiration to hit and FINALLY I was headed in the right direction. Here is the finished product. Hope you like it as much as I do! Drop me a comment and let me know what you do when you have creative block!


Kitchen Island Makeover

What a fun project. Here is the before:

While the kitchen is nice the island doesn’t stand out.

And here is the after.

Island now painted distressed black.

Close up

This is a large kitchen and I think that the island could get lost. The island has been painted a black/charcoal color with many brown and black glazes over it. It is finished in layers of polyurethane that will hold up to the great wear and tear that are required from a kitchen. In the after photo the island is now the center of attention. Hope you enjoy and please contact me for a no obligation quote on your cabinet makeover!